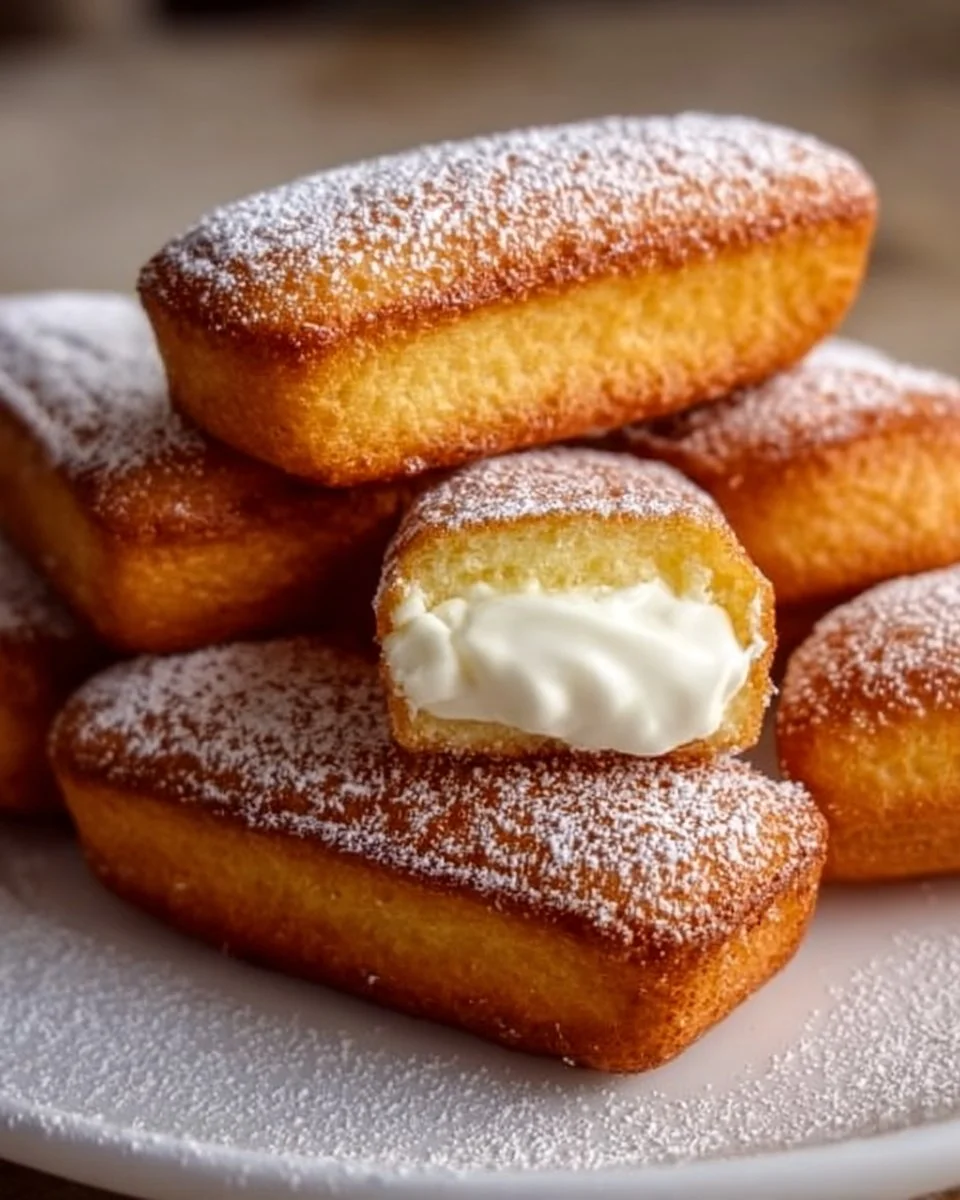
The intoxicating aroma of freshly baked sponge cake wafts through the kitchen, teasing your senses and igniting childhood memories of store-bought treats. Sweetness fills the air as golden cakes cool on the counter, their delicate texture inviting a touch. You can’t help but remember the joy of a deliciously creamy, filling injection, the playful frosting that oozes as you take that first bite. Homemade Twinkies promise to deliver not just dessert, but a delightful experience that transcends any ordinary snack.
Each bite of these homemade gems transports you to a world where you relish every crumb. With a tender exterior that lends an ethereal softness, and a rich, fluffy interior bursting with decadent cream, your taste buds awaken to a harmonious dance of flavor and texture. These little cakes radiate joy, perfect for celebrations or simply a sweet evening treat. They beckon to be savored, enjoyed slowly, and shared among friends and family. There’s something undeniably special about crafting these nostalgic confections in your own kitchen.
Why You’ll Love This Homemade Twinkies
Homemade Twinkies encapsulate the essence of indulgence, making them a treat you can’t resist returning to. First and foremost, the flavor profile bursts with nostalgia. Their light vanilla essence complements the rich cream filling perfectly, creating a delightful symphony in your mouth. Each spongey bite melts in your mouth, leaving you craving just one more.
These delights shine on various occasions—be it a birthday celebration, a casual get-together, or even a comforting family night at home. They’re not just beautiful to look at but are also customizable, welcoming your creative whims. You can swap the vanilla for other extracts like almond or lemon, explore flavored fillings, or even dip them in melted chocolate to elevate their sweetness. Regardless of how you choose to personalize them, the result is sure to leave everyone grinning ear to ear.
Preparation Phase & Tools to Use
Creating homemade Twinkies requires just a handful of essential tools, each one serving an important purpose in this dessert adventure. Here’s what you will need:
- Twinkie Pan or Muffin Tin: A dedicated Twinkie pan facilitates the signature shape, producing perfectly formed sponge cakes. If you don’t have one, a muffin tin works just as well; it results in charming mini cakes.
- Mixing Bowls: A set of mixing bowls allows you to easily combine ingredients without mess. Opt for different sizes to keep things organized while you whip and mix.
- Electric Mixer: While you can mix by hand, an electric mixer saves time and yields fluffier results, especially when creaming butter and sugar.
- Piping Bag: A piping bag ensures that your filling is injected precisely where it belongs—inside the cakes! You can DIY one using a zip-top bag if you don’t have a fancy one.
- Cooling Rack: This allows your cakes to cool evenly, preserving their light texture and preventing sogginess from condensation.
Here are some practical preparation tips: Ensure ingredients are at room temperature for the best mixing and texture, and always preheat your oven before baking. This tiny step ensures an even bake and perfect rise for your cakes.
Ingredients for Homemade Twinkies
To create your delightful treats, gather the following ingredients:
- 1 cup all-purpose flour: The backbone of your sponge cake, providing structure and lightness. You can substitute with a gluten-free blend if needed.
- 1 tsp baking powder: This provides the necessary lift, ensuring your cakes rise beautifully.
- 1/4 tsp salt: Just a pinch elevates flavors and balances sweetness.
- 1/4 cup unsalted butter, softened: This adds richness and contributes to a tender crumb. Use vegan butter if you prefer a dairy-free option.
- 1/2 cup granulated sugar: Sweetness is key here, but you can experiment with coconut sugar for a more caramel-like flavor.
- 2 large eggs: Eggs provide moisture and structure. For an egg-free alternative, consider using applesauce or flax eggs.
- 1 tsp vanilla extract: Offers aromatic sweetness, but consider almond or even citrus extracts for a twist.
- 1/2 cup milk: Whole milk contributes to a moist cake. Feel free to use plant-based milk as a substitute.
For the filling:
- 1 cup heavy cream: Whipped to create that rich, luscious filling. Coconut cream serves as a dairy-free alternative.
- 2 tbsp powdered sugar: Sweetens the cream, giving it that dessert-like quality.
- 1 tsp vanilla extract: Compliments the rich cream while enhancing its overall flavor profile.
How to Make Homemade Twinkies
-
Preheat the Oven: Set your oven to 350°F (175°C) and grease your Twinkie pan or muffin tin with a touch of butter or non-stick spray, so the cakes release easily later on.
-
Sift the Dry Ingredients: In a bowl, sift together the flour, baking powder, and salt. Sifting removes lumps and creates an airy mixture that promotes better rising.
-
Cream Butter and Sugar: In another bowl, use an electric mixer to cream together the softened butter and sugar until light and fluffy, about 3-5 minutes. This process incorporates air, making your cakes light.
-
Add Eggs and Vanilla: Beat in the eggs one at a time, ensuring each one is fully incorporated before adding the next. Stir in the vanilla extract, infusing the batter with delightful aroma.
-
Combine Wet and Dry Ingredients: Gradually mix in the flour mixture alternately with the milk, starting and ending with the flour. This method ensures a smooth batter without overmixing.
-
Fill the Pan: Pour the batter into your prepared pans, filling each cavity about two-thirds full. Don’t overfill, as they will rise. Aim for precision—it makes all the difference!
-
Bake: Place the pan in the preheated oven and bake for 15-20 minutes. Check for doneness by inserting a toothpick; it should come out clean.
-
Cool Down: Allow the cakes to cool in the pan for a few minutes before transferring them to a cooling rack. This step is vital for maintaining a perfect texture.
-
Prepare the Filling: In a mixing bowl, whip the heavy cream with the powdered sugar and vanilla until soft peaks form. Don’t overwhip; you want a luscious, creamy consistency.
-
Fill the Cakes: Once your cakes have cooled completely, use a piping bag to fill them with the whipped cream, injecting it from one end of the cake. Each bite should reveal that delightful, creamy core.
-
Serve and Enjoy: Your homemade Twinkies are ready! Dive in and relish the moment, sharing this joy with loved ones or enjoying a solitary treat.
Chef’s Notes & Helpful Tips
- Make-Ahead Tips: You can bake the sponge cakes a day in advance. Just store them in an airtight container once completely cooled, then fill with cream right before serving to ensure freshness.
- Cooking Alternatives: If you’re out of a traditional oven, consider using an air fryer. Adjust cooking time, and keep an eye on them to prevent browning too fast.
- Customization Ideas: Feel free to be creative! Add cocoa powder to the batter for chocolate Twinkies, or infuse different flavors into the cream. You might try fillings like strawberry jam or peanut butter for a delightful twist.
Common Mistakes to Avoid
- Incorrect Measurements: Baking is a science; be precise with measurements. Use a kitchen scale for accuracy, especially for ingredients like flour, which can be easily compacted.
- Overmixing: Mixing the batter too much after adding dry ingredients leads to dense cakes. Blend ingredients just until combined for a light, fluffy texture.
- Not Allowing Cakes to Cool: If you attempt to fill the cakes while they’re still warm, the cream will melt. Allow ample cooling time for the cakes to keep their structure.
- Underbaking: Trust your instincts! If they seem undercooked when you check, give them a few minutes more. This ensures that they rise properly and develop a delightful texture.
What to Serve With Homemade Twinkies
Add some joy to your dessert spread with these delightful pairings:
- Fresh Berries: Strawberries, blueberries, or raspberries add a refreshing tartness that complements the sweetness of the Twinkies.
- Whipped Cream: A dollop of freshly whipped cream enhances the indulgence or can be a playful decoration.
- Chocolate Sauce: Drizzle warm chocolate sauce over them for a delightful contrast that will excite chocolate lovers.
- Coffee or Tea: Serve alongside a cuppa to balance sweetness with a warm, rich beverage—perfect for afternoon treats.
- Ice Cream: Pair them with a scoop of vanilla or chocolate ice cream for a luscious dessert experience.
- Milk: Classic and timeless, a cold glass of milk complements the creamy filling perfectly.
- Fruit Sorbet: For a refreshing twist, consider a scoop of sorbet alongside your Twinkies, especially in warmer weather.
- Caramel Drizzle: For those with a sweet tooth, a drizzle of caramel sauce adds another layer of indulgence.
Storage & Reheating Instructions
Store your homemade Twinkies in an airtight container in the refrigerator for up to 4 days. Storing them in the fridge helps keep the creamy filling fresh and prevents sogginess. If you need to freeze them, do so before filling; wrap each cake in plastic wrap and store in a freezer bag for up to 3 months. To enjoy, simply thaw in the fridge overnight and fill on the day you wish to serve.
Reheat in a microwave for 10-15 seconds if you enjoy them warm—just be cautious not to overdo it, as you don’t want to melt the whipped filling.
Estimated Nutrition Information
While your homemade Twinkies are certainly indulgent, here’s a rough glance at the nutrition per Twinkie (estimated):
- Calories: 210
- Total Fat: 10g
- Saturated Fat: 6g
- Cholesterol: 45mg
- Sodium: 150mg
- Total Carbohydrates: 28g
- Dietary Fiber: 0.5g
- Sugars: 15g
- Protein: 2g
Note: These are approximate values and can change based on ingredient variations and serving sizes.
FAQs
1. Can I make these without eggs?
Absolutely! Substitutes like flax eggs (1 tablespoon flaxseed meal plus 2.5 tablespoons water per egg) or unsweetened applesauce work wonderfully in these cakes.
2. How can I make the filling more flavorful?
You can add extracts like almond or lemon or fold in some citrus zest for an exciting flavor twist.
3. Can I use gluten-free flour for this recipe?
Yes, a 1:1 gluten-free flour blend can work well. Make sure it contains xanthan gum for best results, or add a bit if your blend doesn’t contain it.
4. Why did my cakes not rise?
Common reasons include using old baking powder or overmixing the batter. Ensure fresh baking powder and mix gently for the best rise.
5. What should I do if my filling is too runny?
If your whipped cream doesn’t hold its shape, consider adding more powdered sugar to stabilize it, or chilling it longer before filling the cakes.
Conclusion
Now that you’ve ventured through this delectable journey of crafting homemade Twinkies, your kitchen is filled with sweet possibilities. There’s something unbelievably satisfying about replicating a nostalgic favorite right in your own home, enjoying them warm or sharing with family and friends. As you take a bite, let the creamy, dreamy filling envelop your taste buds and transport you back to carefree days, while allowing you to create your new culinary memories. This is one recipe you’ll want to return to again and again. Happy baking!
Print
Homemade Twinkies
- Prep Time: 15 minutes
- Cook Time: 20 minutes
- Total Time: 35 minutes
- Yield: 12 servings 1x
- Category: Dessert
- Method: Baking
- Cuisine: American
- Diet: Vegetarian
Description
Indulge in the nostalgic delight of homemade Twinkies, fluffy sponge cakes filled with rich cream for a perfect treat.
Ingredients
- 1 cup all-purpose flour
- 1 tsp baking powder
- 1/4 tsp salt
- 1/4 cup unsalted butter, softened
- 1/2 cup granulated sugar
- 2 large eggs
- 1 tsp vanilla extract
- 1/2 cup milk
- 1 cup heavy cream (for filling)
- 2 tbsp powdered sugar (for filling)
- 1 tsp vanilla extract (for filling)
Instructions
- Preheat the oven to 350°F (175°C) and grease your Twinkie pan or muffin tin.
- Sift the flour, baking powder, and salt together in a bowl.
- Cream the softened butter and sugar until light and fluffy.
- Add the eggs one at a time, beating well after each addition, then stir in the vanilla.
- Combine the wet and dry ingredients, mixing alternately with the milk.
- Fill the pan about two-thirds full with the batter.
- Bake for 15-20 minutes or until a toothpick comes out clean.
- Cool in the pan briefly, then transfer to a cooling rack.
- Whip the heavy cream with powdered sugar and vanilla until soft peaks form.
- Fill the cooled cakes with the whipped cream using a piping bag.
- Serve and enjoy your homemade Twinkies!
Notes
For a dairy-free option, substitute with plant-based milk and butter. You can also experiment with different extracts for flavor variations.
Nutrition
- Serving Size: 1 Twinkie
- Calories: 210
- Sugar: 15g
- Sodium: 150mg
- Fat: 10g
- Saturated Fat: 6g
- Unsaturated Fat: 4g
- Trans Fat: 0g
- Carbohydrates: 28g
- Fiber: 0.5g
- Protein: 2g
- Cholesterol: 45mg