Introduction to Easter Bunny Cheese Ball
As the vibrant colors of spring emerge, I find myself dreaming of festive gatherings filled with laughter and joy. One dish that never fails to impress is the Easter Bunny Cheese Ball. This delightful creation not only looks adorable but also tastes amazing! It’s a quick solution for busy days when you want to wow your guests without spending hours in the kitchen. Plus, it’s a fun way to get the family involved in the kitchen. Trust me, this cheese ball will be the star of your holiday table!
Why You’ll Love This Easter Bunny Cheese Ball
This Easter Bunny Cheese Ball is a game-changer for busy moms and professionals alike. It’s incredibly easy to whip up, taking just 20 minutes of prep time. The combination of creamy cheeses and crunchy walnuts creates a delightful flavor explosion that everyone will love. Plus, its charming bunny shape adds a festive touch to your table, making it a perfect centerpiece for your holiday gatherings!
Ingredients for Easter Bunny Cheese Ball
Creating the Easter Bunny Cheese Ball is a delightful adventure, and it all starts with the right ingredients. Here’s what you’ll need:
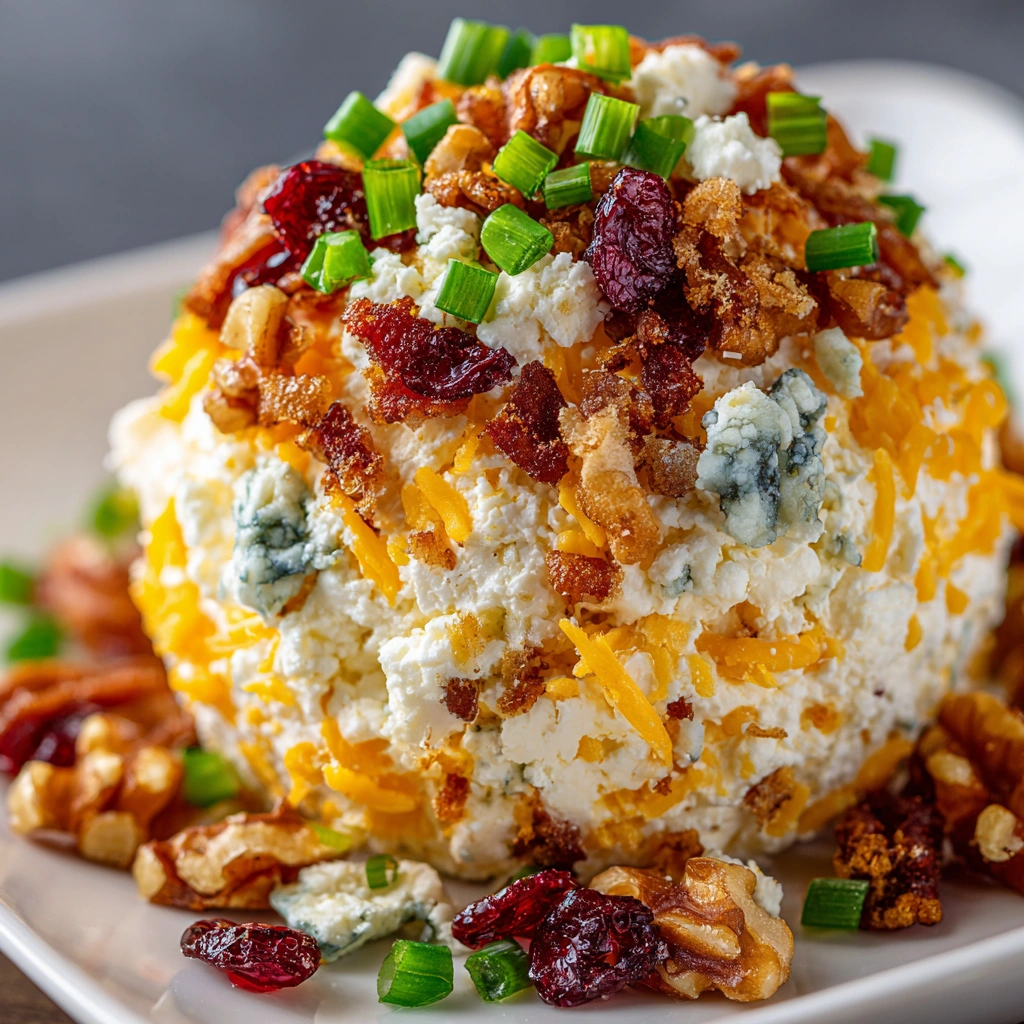
- Cream cheese: This is the creamy base that holds everything together. Make sure it’s softened for easy mixing.
- Shredded cheddar cheese: Adds a sharp, tangy flavor that balances the creaminess of the cream cheese.
- Crumble blue cheese: For those who love bold flavors, this cheese brings a unique twist to the mix.
- Chopped green onions: These add a fresh, mild onion flavor that brightens up the cheese ball.
- Chopped walnuts: A crunchy element that adds texture and a nutty flavor. You can substitute with pecans if you prefer.
- Dried cranberries: These little gems provide a sweet contrast to the savory cheeses, making every bite a treat.
- Garlic powder: A pinch of this adds depth and enhances the overall flavor.
- Onion powder: Similar to garlic powder, it brings a subtle onion flavor without overpowering the dish.
- Salt and black pepper: Essential seasonings that elevate the taste of the cheese ball.
- Shredded coconut: This is for decoration, giving the bunny a fluffy appearance. You can use sweetened or unsweetened, depending on your preference.
- Candy eyes: These are the finishing touch that brings your bunny to life! You can find them at most craft stores or online.
- Small carrot: A cute little nose that completes the bunny look. You can use a baby carrot or cut a regular carrot to size.
For those who want to spice things up, consider adding jalapeños to the cheese mixture for a kick! All the exact quantities are at the bottom of the article, ready for printing.
How to Make Easter Bunny Cheese Ball
Now that you have all your ingredients ready, let’s dive into the fun part—making the Easter Bunny Cheese Ball! This process is simple and enjoyable, perfect for involving the kids or even a friend. Follow these steps, and you’ll have a delightful centerpiece for your holiday table in no time!
Step 1: Mix the Cheese Ingredients
Start by grabbing a large mixing bowl. Combine the softened cream cheese, shredded cheddar cheese, and crumbled blue cheese. Add in the chopped green onions, walnuts, and dried cranberries. Sprinkle in the garlic powder, onion powder, salt, and black pepper. Mix everything together until it’s well combined and smooth. I like to use a hand mixer for this, but a sturdy spoon works just fine too!
Step 2: Shape the Bunny
Once your cheese mixture is ready, it’s time to get creative! Form the mixture into a large ball. Then, gently shape it into a bunny form. You can make the body round and elongate one end for the bunny’s head. Don’t worry about perfection; a little whimsy adds to the charm!
Step 3: Chill the Cheese Ball
Cover your bunny-shaped cheese ball with plastic wrap. This step is crucial! Refrigerate it for at least 2 hours to firm up. Chilling not only helps the flavors meld together but also makes it easier to handle when decorating. While you wait, you can plan your presentation or even prepare some delicious sides!
Step 4: Decorate the Bunny
After chilling, it’s time for the fun part—decorating! Roll the cheese ball in shredded coconut to give it that fluffy bunny look. Then, attach the candy eyes and place a small carrot for the nose. This is where your bunny really comes to life! Feel free to get creative with the decorations; you can even add little ears if you like!
Step 5: Serve and Enjoy
Your Easter Bunny Cheese Ball is now ready to shine at your gathering! Serve it with an assortment of crackers or fresh vegetable sticks. Watching your guests’ faces light up as they dig into this festive treat is the best part. Enjoy the compliments and the joy this dish brings to your holiday celebration!
Tips for Success
- Make sure your cream cheese is fully softened for easy mixing.
- Chill the cheese ball overnight for even better flavor.
- Use a cookie scoop for even shaping if you want a uniform look.
- Experiment with different nuts or dried fruits for a unique twist.
- Keep extra coconut on hand for touch-ups during decoration.
Equipment Needed
- Mixing bowl: A large bowl is essential. A sturdy pot can work in a pinch.
- Hand mixer: This makes mixing easier, but a wooden spoon will do just fine.
- Plastic wrap: To cover the cheese ball while it chills. A reusable container can also work.
- Cookie scoop: For shaping, but your hands are perfectly capable too!
Variations
- Spicy Bunny: Add diced jalapeños or a dash of hot sauce to the cheese mixture for a spicy kick.
- Herbed Delight: Mix in fresh herbs like dill or chives for a burst of flavor and freshness.
- Nut-Free Option: Omit the walnuts and replace them with sunflower seeds for a crunchy texture without nuts.
- Vegan Version: Use vegan cream cheese and nutritional yeast for a dairy-free alternative that still tastes great.
- Fruit Twist: Substitute dried cranberries with chopped apricots or raisins for a different sweet touch.
Serving Suggestions
- Pair the Easter Bunny Cheese Ball with an assortment of colorful crackers for a delightful crunch.
- Fresh vegetable sticks like carrots, celery, and bell peppers add a healthy touch.
- Serve with a light white wine or sparkling water for a refreshing drink.
- Consider a festive platter with seasonal fruits for a vibrant presentation.
FAQs about Easter Bunny Cheese Ball
As you prepare to create your Easter Bunny Cheese Ball, you might have a few questions. Here are some common queries that can help you along the way:
Can I make the Easter Bunny Cheese Ball in advance?
Absolutely! This cheese ball can be made a day ahead. Just store it in the refrigerator, wrapped tightly in plastic wrap. This allows the flavors to meld beautifully!
What can I serve with the cheese ball?
Pair your Easter Bunny Cheese Ball with an array of crackers, fresh vegetable sticks, or even sliced baguette. The options are endless, and they all complement the creamy texture perfectly!
How long can I keep leftovers?
If you have any leftovers, store them in an airtight container in the fridge. They should last for about 3-4 days. Just be sure to enjoy them before they disappear!
Can I customize the flavors?
Definitely! Feel free to experiment with different cheeses, nuts, or dried fruits. You can even add herbs or spices to create a unique flavor profile that suits your taste!
Is this recipe suitable for vegetarians?
Yes, the Easter Bunny Cheese Ball is vegetarian-friendly! It’s a delightful option for your holiday gatherings, ensuring everyone can enjoy this festive treat.
Final Thoughts
Creating the Easter Bunny Cheese Ball is more than just a cooking project; it’s a joyful experience that brings family and friends together. The smiles on your loved ones’ faces as they admire your adorable creation are priceless. This festive dish not only tastes delicious but also adds a whimsical touch to your holiday table. Whether you’re hosting a big gathering or a cozy family dinner, this cheese ball is sure to be a hit. So roll up your sleeves, gather your ingredients, and let the fun begin! Happy cooking, and may your Easter be filled with joy and laughter!
Print
Easter Bunny Cheese Ball Recipe That Will Impress Guests
- Prep Time: 20 minutes
- Cook Time: 0 minutes
- Total Time: 2 hours 20 minutes
- Yield: 8 servings 1x
- Category: Appetizer
- Method: No-cook
- Cuisine: American
- Diet: Vegetarian
Description
A delightful and festive cheese ball shaped like an Easter bunny, perfect for impressing guests at your holiday gatherings.
Ingredients
- 8 oz cream cheese, softened
- 1 cup shredded cheddar cheese
- 1/2 cup crumbled blue cheese
- 1/4 cup chopped green onions
- 1/4 cup chopped walnuts
- 1/4 cup dried cranberries
- 1 tsp garlic powder
- 1 tsp onion powder
- 1/2 tsp salt
- 1/2 tsp black pepper
- 1/2 cup shredded coconut (for decoration)
- 2 candy eyes
- 1 small carrot (for nose)
Instructions
- In a mixing bowl, combine cream cheese, cheddar cheese, blue cheese, green onions, walnuts, cranberries, garlic powder, onion powder, salt, and pepper.
- Mix until well combined and smooth.
- Shape the mixture into a large ball and then form it into a bunny shape.
- Cover the cheese ball with plastic wrap and refrigerate for at least 2 hours to firm up.
- Once chilled, roll the cheese ball in shredded coconut to create a fluffy texture.
- Attach candy eyes and a small carrot for the nose to complete the bunny look.
- Serve with crackers or vegetable sticks.
Notes
- For a spicier version, add jalapeños to the cheese mixture.
- Can be made a day in advance and stored in the refrigerator.
- Feel free to customize the decorations to suit your theme.
Nutrition
- Serving Size: 1 serving
- Calories: 150
- Sugar: 2g
- Sodium: 250mg
- Fat: 12g
- Saturated Fat: 6g
- Unsaturated Fat: 4g
- Trans Fat: 0g
- Carbohydrates: 5g
- Fiber: 1g
- Protein: 6g
- Cholesterol: 30mg