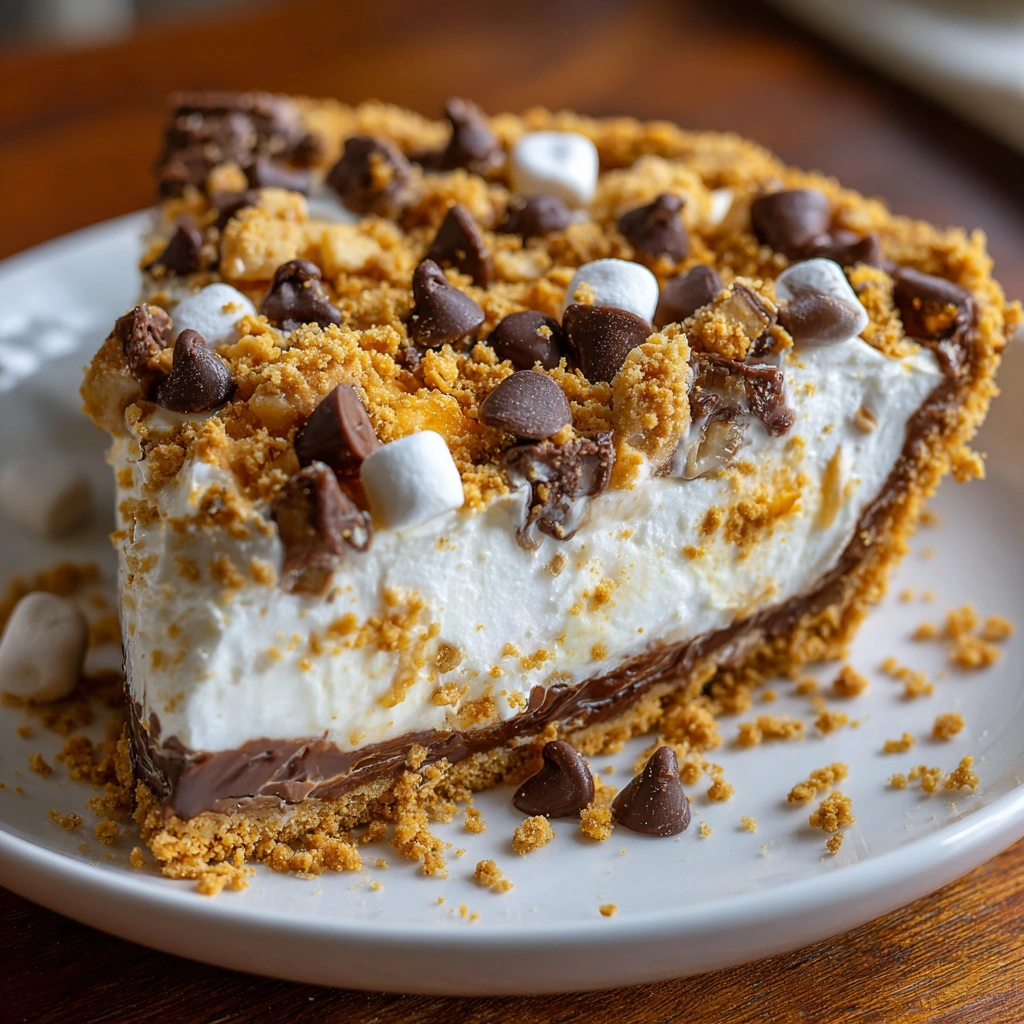
Introduction to Texas Trash Pie
Hey there, fellow dessert lovers! If you’re looking for a sweet treat that’s as fun to make as it is to eat, let me introduce you to Texas Trash Pie. This delightful dessert is a fantastic way to bring a little joy to your busy day. With its unique blend of flavors and textures, it’s sure to impress your family and friends. Plus, it’s quick to whip up, making it the perfect solution for those last-minute gatherings or cozy nights in. Trust me, once you try this pie, it’ll become a staple in your dessert rotation!
Why You’ll Love This Texas Trash Pie
This Texas Trash Pie is a game-changer for busy moms and professionals alike. It’s incredibly easy to make, requiring just a handful of ingredients and minimal prep time. The combination of sweet and savory flavors creates a taste explosion that will have everyone asking for seconds. Plus, it’s versatile enough to suit any occasion, whether it’s a family dinner or a potluck with friends. You’ll love how quickly it disappears!
Ingredients for Texas Trash Pie
Gathering the right ingredients is the first step to creating your Texas Trash Pie masterpiece. Here’s what you’ll need:
- Crushed graham crackers: These form the base of your pie crust, adding a sweet crunch.
- Unsalted butter: Melted butter binds the crust together and adds richness.
- Sweetened condensed milk: This creamy ingredient sweetens the filling and gives it a luscious texture.
- Chocolate chips: Choose your favorite type—milk, dark, or even white chocolate—for a delightful burst of flavor.
- Chopped nuts: Pecans or walnuts add a satisfying crunch and nutty flavor. Feel free to swap them out for your preferred variety.
- Shredded coconut: This ingredient brings a tropical twist and chewy texture to the pie.
- Mini marshmallows: These little puffs add a fun, gooey element that kids and adults alike will love.
- Toffee bits: For a sweet, buttery crunch, these bits are the perfect finishing touch.
For those with dietary restrictions, you can easily make this pie gluten-free by using gluten-free graham crackers. The beauty of Texas Trash Pie is its versatility; feel free to customize the nuts and chocolate types based on your taste preferences. If you’re curious about exact measurements, don’t worry! You can find them at the bottom of the article, ready for printing.
How to Make Texas Trash Pie
Now that you have all your ingredients ready, let’s dive into the fun part—making your Texas Trash Pie! Follow these simple steps, and you’ll have a delicious dessert that’s sure to wow your family and friends.
Step 1: Preheat the Oven
First things first, preheat your oven to 350°F (175°C). Preheating is crucial because it ensures that your pie bakes evenly. A hot oven helps the crust become golden and the filling to set perfectly. Trust me, you don’t want to skip this step!
Step 2: Prepare the Crust
In a mixing bowl, combine your crushed graham crackers with the melted butter. Stir until the crumbs are well-coated. This mixture should resemble wet sand. Now, press it firmly into the bottom of your pie dish. Make sure to create an even layer, as this will be the foundation of your Texas Trash Pie. A sturdy crust is key to holding all that delicious filling!
Step 3: Mix the Filling
In another bowl, it’s time to mix the filling. Combine the sweetened condensed milk, chocolate chips, chopped nuts, shredded coconut, mini marshmallows, and toffee bits. Stir everything together until well combined. The mixture should be thick and gooey, with all those delightful ingredients evenly distributed. This is where the magic happens!
Step 4: Assemble the Pie
Now, pour the filling over your prepared crust. Use a spatula to spread it evenly across the surface. Make sure every corner is filled with that luscious mixture. This step is where you can really get creative—feel free to sprinkle a few extra chocolate chips or nuts on top for added flair!
Step 5: Bake the Pie
Place your pie in the preheated oven and bake for 25-30 minutes. Keep an eye on it! You’ll know it’s done when the top is golden brown and slightly bubbly. If you gently shake the pie, it should have a slight jiggle but not be liquidy. This is the perfect time to start dreaming about that first slice!
Step 6: Cool and Serve
Once baked, remove the pie from the oven and let it cool for at least 15 minutes. This cooling time allows the filling to set up a bit more. When you’re ready to serve, slice it into generous pieces. Whether you enjoy it warm or chilled, each bite will be a delightful explosion of flavors!
Tips for Success
- Use room temperature ingredients for a smoother filling.
- Don’t skip the cooling time; it helps the pie set properly.
- For a richer flavor, toast the nuts before adding them.
- Experiment with different chocolate types for unique twists.
- Store leftovers in an airtight container to keep them fresh.
Equipment Needed
- 9-inch pie dish: A standard pie dish works best, but a glass or ceramic one adds a nice touch.
- Mixing bowls: Use any size you have on hand; just make sure they’re large enough for mixing.
- Spatula: A rubber spatula is great for spreading the filling evenly.
- Measuring cups: Essential for accurate ingredient portions.
- Oven mitts: Protect your hands when handling hot dishes!
Variations of Texas Trash Pie
- Nut-Free Version: Omit the nuts or substitute with sunflower seeds for a similar crunch without the allergens.
- Chocolate Lovers: Add an extra half cup of chocolate chips or use a mix of dark and milk chocolate for a richer flavor.
- Fruit Twist: Incorporate dried fruits like cranberries or cherries for a sweet and tangy contrast.
- Vegan Option: Use vegan butter, coconut cream instead of sweetened condensed milk, and dairy-free chocolate chips.
- Spiced Up: Add a teaspoon of cinnamon or a pinch of cayenne pepper to the filling for a surprising kick!
Serving Suggestions for Texas Trash Pie
- Pair with a scoop of vanilla ice cream for a delightful contrast in temperature and texture.
- Serve alongside fresh berries for a pop of color and a refreshing bite.
- Drizzle with chocolate or caramel sauce for an extra indulgent touch.
- Garnish with whipped cream and a sprinkle of toasted coconut for a beautiful presentation.
- Enjoy with a cup of coffee or a glass of milk to balance the sweetness.
FAQs about Texas Trash Pie
As you embark on your Texas Trash Pie journey, you might have a few questions. Here are some common queries that I’ve encountered, along with helpful answers to guide you along the way!
Can I make Texas Trash Pie ahead of time?
Absolutely! This pie can be made a day in advance. Just store it in the refrigerator after it cools. It tastes even better the next day as the flavors meld together!
What can I substitute for sweetened condensed milk?
If you’re looking for a substitute, you can use coconut cream or a homemade version made from milk and sugar. Just keep in mind that it may alter the flavor slightly.
How do I store leftovers?
Store any leftover Texas Trash Pie in an airtight container in the fridge. It should stay fresh for about 3-4 days. Just reheat it slightly before serving if you prefer it warm!
Can I freeze Texas Trash Pie?
Yes, you can freeze it! Wrap the pie tightly in plastic wrap and then in aluminum foil. It can be frozen for up to 2 months. Thaw it in the fridge overnight before serving.
What’s the best way to serve Texas Trash Pie?
Serve it chilled or warm, topped with whipped cream or a scoop of ice cream. A sprinkle of toasted coconut or nuts on top adds a lovely finishing touch!
Final Thoughts
Making Texas Trash Pie is more than just baking; it’s about creating sweet memories with loved ones. The joy of watching faces light up with each delicious bite is truly priceless. This pie is a delightful blend of flavors that brings everyone together, whether it’s a family gathering or a casual get-together with friends. Plus, its simplicity means you can whip it up even on the busiest days. So, roll up your sleeves, gather your ingredients, and let the magic of Texas Trash Pie fill your home with warmth and happiness. You won’t regret it!
Print
Texas Trash Pie: Discover the Secret Deliciousness!
- Prep Time: 15 minutes
- Cook Time: 30 minutes
- Total Time: 45 minutes
- Yield: 8 servings 1x
- Category: Dessert
- Method: Baking
- Cuisine: American
- Diet: Vegetarian
Description
Texas Trash Pie is a delightful dessert that combines a variety of sweet and savory ingredients, creating a unique flavor profile that is sure to please any crowd.
Ingredients
- 1 cup crushed graham crackers
- 1/2 cup unsalted butter, melted
- 1 cup sweetened condensed milk
- 1 cup chocolate chips
- 1 cup chopped nuts (pecans or walnuts)
- 1 cup shredded coconut
- 1/2 cup mini marshmallows
- 1/2 cup toffee bits
Instructions
- Preheat the oven to 350°F (175°C).
- In a mixing bowl, combine crushed graham crackers and melted butter, then press the mixture into the bottom of a pie dish to form the crust.
- In another bowl, mix together sweetened condensed milk, chocolate chips, chopped nuts, shredded coconut, mini marshmallows, and toffee bits.
- Pour the filling over the prepared crust and spread it evenly.
- Bake in the preheated oven for 25-30 minutes, or until the top is golden brown.
- Allow to cool before slicing and serving.
Notes
- For a gluten-free version, use gluten-free graham crackers.
- Feel free to customize the nuts and chocolate types based on your preference.
- This pie can be served warm or chilled.
Nutrition
- Serving Size: 1 slice
- Calories: 350
- Sugar: 25g
- Sodium: 150mg
- Fat: 20g
- Saturated Fat: 10g
- Unsaturated Fat: 8g
- Trans Fat: 0g
- Carbohydrates: 40g
- Fiber: 2g
- Protein: 5g
- Cholesterol: 30mg